FYI, this project is listed as "retired." It may no longer function or I may
just not be updating it anymore.
If you use TextMate to blog on a WordPress site, you’ll want to see this.
There are two parts to this: a WordPress plugin that adds an XML-RPC call for getting all of the tags in use on the blog, and a small TextMate bundle for making good use of it. The TextMate bundle cribs off of my previous AutoTag project, and borrows most of the remote functionality from the original TextMate blogging bundle. Why reinvent the wheel? I’m bundling both together in the download, so if you want to use the WordPress plugin to port the functionality elsewhere (say, Vim?), you can just pull out the parts you need.
AutoTagging in TextMate
What the bundle does (short version) is find the most appropriate tags for your content based on tags you’ve already used before. This helps you easily keep your tag collection trim and useful. No disparate tags because of inconsistent capitalization, plurals or conjugation. Things that are related stay related. This can be especially difficult blogging from TextMate because you can’t quickly see “all tags” the way you can from the WordPress editor. This solves the problem.
Install the WordPress plugin
Standard install, like any other (manually-installed) plugin:
- Upload the gettags-rpc folder from the zip download to your
wp-content/plugins folder on your server.
- Open your admin page and go to the Plugins panel.
- Activate the GetTags-RPC plugin in the plugin list.
If the plugin activates without error, you should be ready to go. It’s a very simple plugin without a lot of error checking, so let me know if you have any trouble with it.
Install the AutoTag bundle
To install AutoTag in TextMate, double click on the bundle in the download zip file. It should open TextMate, pop up the Bundle Editor and show you the installed bundle and its commands. Done.
Assuming you have AutoTag installed in TextMate and the GetTags-RPC plugin installed in WordPress, you’re ready to go. Well, you’ll need to have your blog set up (Bundles > Blogging > Setup Blogs) in TextMate, but we’ll assume you’ve done that by now.
Using the commands
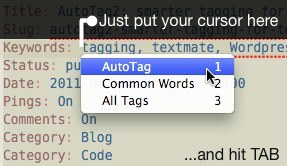 The AutoTag commands can be triggered in two ways. First, you can just put your cursor one space after the colon in the “Keywords:” line of the template headers. If you don’t have that line in your template, you can just type “Keywords: “ on a line before the end of the headers, or add it permanently by editing the template in the Bundle Editor. Hit tab from there and you’ll get a menu of the three commands in the bundle. You can trigger that from the same point even if you already have tags on the line; it will add appropriate commas automatically. Second, you can use Control-Option-T to get the same menu at any point in the file, although I’m not sure why you’d call it from anywhere other than the “Keywords” line.
Commands
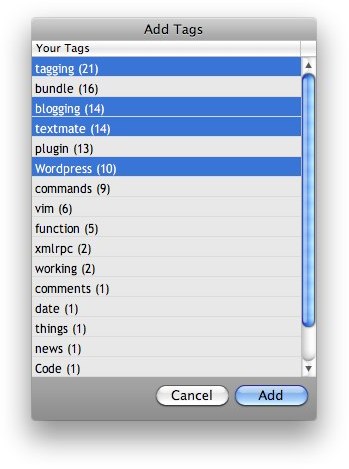 AutoTag: This is the primary command, or at least my favorite in the bundle. It’s only good when you run it after you write your post; it doesn’t have anything to work with on a blank template. Finish your post (or open an existing one) and trigger the command. It will grab all existing tags on your blog and compare them to your text, resulting in a dialog with a list of the best matches ranked by relevance. If you’re curious, here’s what it does when processing:
- Strips out all punctuation from the content of your post and creates an array of words
- Uses the Porter Stemming algorithm to get the stem of each word. This makes plurals, adjective, adverb and verb forms all represent the same word.
- Compares the list of stemmed words to the stems of each tag returned by your blog, keeping matches.
- Measures the frequency of each match in the content and sorts the list accordingly.
Common Words: This command ignores the tags on your blog and just gives you the most common words from your post for selection as tags. It’s a good way to figure out what new tags might be worth adding. Again, it’s not very useful if you don’t have your content written yet.
All Tags: If you’re not finding the AutoTag results satisfactory on a given post, or you want to tag before you have any content, this command will simply return your entire list of available tags. You can use it to check what form or casing you used on an existing tag, and it can be run at any time.
That’s it. If you use WordPress and TextMate together, I know you’re going to love this. Let me know how it goes! By the way, I’ll probably (eventually) build similar functionality right into the WordPress editor, and I’d love to see this ported to Vim, too. Any Vim plugin writers want a challenge?
Download
