I’ve been using a workflow for web images for a while. The final part of the workflow is specific to my Jekyll install, so I’ll be taking a look at whether I can make that of more general interest or not. I think the first two parts are pretty cool, though.
We’ll start at the beginning of the optimization stage. You’ve created (or received) the final image destined for the web. You know the specific sizes the destination site needs for optimal display. On this blog, I start with 1600px-wide image for full-width, 700px for inset, both being the @2x size for high-resolution displays. The step between hitting “Save” and uploading it to the web, then, is usually to resize, output 1x and 2x versions, and optimize the results.
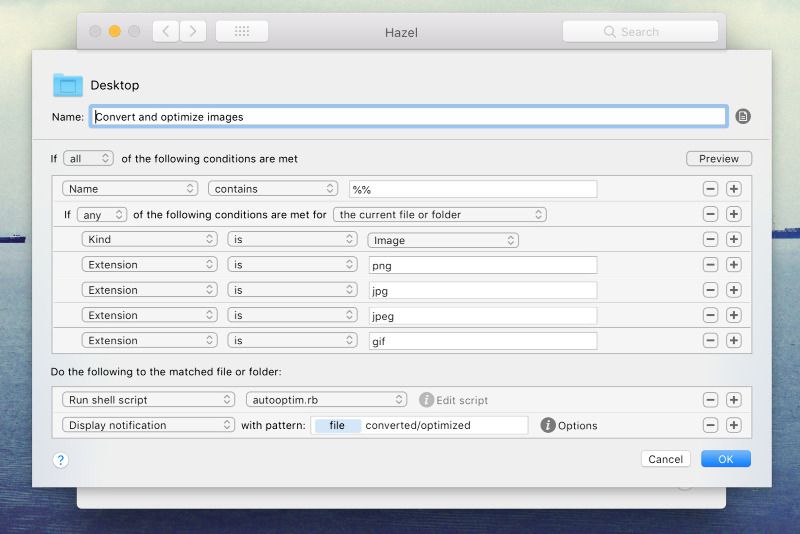
I do this with Hazel and a special naming pattern. When I save an image, I can add a series of special characters at the end, separated from the name by a double percent symbol (%%). When Hazel detects an image on the desktop or other defined folder that matches that scheme, it runs a script that parses out the options, does the conversions and optimizations, and then outputs file(s) with the correct names to the original location.
For example, if I save a file to the Desktop titled header_image@2x%%oh.png, the h will cause a 1/2 size version (i.e. @1x) to be output, and the o will cause both versions to be optimized (shrunk, squished, crushed, whatever is appropriate).
Any combination of options can be used, and in any order after the %% in the filename. Here are all the options:
o – optimize image
Tool chosen automatically based on file extension
c – convert PNG to JPEG
Ignored if the file is already a JPEG.
Because photographic images with a wide color range and no need for transparent background are significantly smaller as JPEG, I mostly use this one to automate processing of files sent to me by others.
h – create a half size image
Assumes the original file is the high res (retina) version and creates a 1x version at exactly half the original dimensions. If the original filename (before the %%) includes @2x, it will just create the same file without the @2x in the name. If not, it will add _sm to the second filename.
rXXX[xXXX] – resize to width or max-[width]x[height]
r followed by a numeric width will resize the image to a maximum width of that size (e.g. %%r800 resizes the image to 800px wide, with the height automatically determined). %%r800x600 will resize the image to a maximum width of 800px, or a maximum height of 600px, whichever is the larger dimension.
Setup
The script requires jpegoptim, pngcrush, and convert from the ImageMagick package. These command line tools have the benefit of being exceptionally scriptable, but also usually give me better lossless compression than any of the commercial image compression tools. Win-win.
All of the aforementioned tools can be installed with Homebrew:
Save the script from this Gist to a local file, make it executable, and add a Hazel rule to whatever folder(s) you want to watch for file saves.
The criteria of the rule should ensure that the file is an image format, and that the name contains %%. Then it should just run a shell script action, pointing to the script you saved above.
From here, just save images with the special filename format and give it a few seconds to run all of the other stuff in the background. Obviously, the same script and techniques could be used to just automate the build process in certain types of blogs, but this method gives me the flexibility to use the naming scheme on images with any destination, and handle/automate the actual upload and as a separate step.
As an example, the Hazel screenshot above was created using macOS screen capture in crosshair mode on my Retina display, saving a PNG to the Desktop. I renamed the file to ImageOptimHazelRule@2x%%r1600hoc.png and got an optimized JPEG version of the screenshot in 800px width and a 1600px @2x version.
I do, as always, hope that this script is useful to at least 5 people because then I feel like it further justifies the time I spend on saving time. If you’ve read this far, you probably know what I mean. On the next episode, I’ll share my scripts and tips for automating the generation of Open Graph images for social media sharing.