Admittedly, my publishing pace has been down for a while, but I’m working to get it back to its former levels. This reboot has been a good chance to re-evaluate my workflow. I thought it was also a good time to share my current list of tools and tricks for blogging.
Collecting
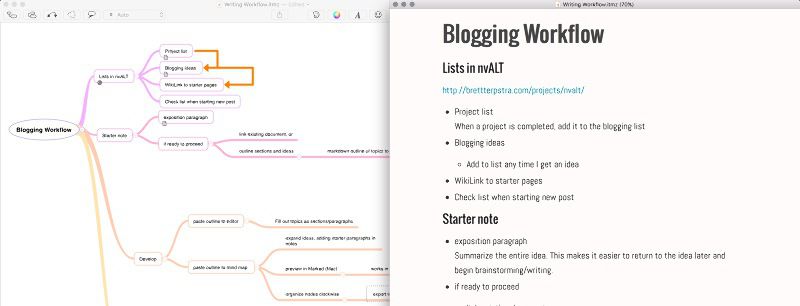
The trick I’ve found to always having something to write about is simply to write down everything I think of writing about. I keep a single list of quick ideas in nvALT titled “Blogging Ideas”. I use a TaskPaper formatted1 list to make it easy to clean up as I mark things @done.
As a large part of my blogging is about projects I work on, I keep a separate list of “Project Ideas.” When a project moves from development to release and I want to write about it, it moves to the writing list.
Brainstorming
I use wiki links in these lists to create a “starter note” for brainstorming. In nvALT this means surrounding the subject with double square brackets, e.g. [[Blogging workflow]]. This is recognized as a wiki link, and clicking the link opens a search for a note with the same name, and hitting enter will create that note if it doesn’t exist.
In the starter note I’ll begin with an exposition paragraph. I usually write it as if it were the first paragraph of a final piece, covering the reason for the post and summarizing the concepts. This little graf makes it much easier for me to come back to an idea, remember what I was thinking more clearly, and avoid the “blank page syndrome.”
If I have a clear enough idea at this point, I’ll start outlining the sections ideas. Just the major points, things that would become level 2 headers if I split the post up. A Markdown format bullet list does the trick.
If an idea gets a starter page and outline, it moves up on the main list. At this point I can leave it until I’m ready to take it to the next stage.
Developing
When I’m ready to start working on a post, it can go one of two directions. If it’s a simple (and short) post, I can just copy the topic outline into MultiMarkdown Composer and start writing. If I want to work on iOS, I have a plethora of tools I enjoy writing in (and I do have an iOS writing app comparison post/series on that Blogging Ideas list). I generally do my best writing on my laptop, though, so MultiMarkdown Composer is where I head most often.
If a post is longer—whether it’s a tutorial, project description, or a review—it goes into a mind map for further brainstorming. I love iThoughtsX (and iThoughts HD on iOS) for this. I can just paste the Markdown bullet list from my notes into a map and it converts it to a new map (with delimiters cleaned up). iThoughts isn’t alone in this capability, but for writing/Markdown work in general I’ve found it the most ideal.
The topic nodes then get child nodes with more paragraph-level notes. In the mind map format, I can just start spitting out all of the concepts and worry about ordering them as they collect. The format also makes it easy for me to take an idea further, branching it out as far and as fast as my brain wants to. If a node develops far enough, it may become clear it should be its own topic, which is a simple matter of dragging the root of the idea to a higher level.
Mind map topics might seem random, but they are sorted clockwise, starting at the top and working around. When you export to another format, this sort order is what will define the final outline. Within a major topic node, child nodes are sorted top to bottom. iThoughts (and most mind mapping apps) offer simple keyboard shortcuts for sorting the nodes without having to drag.
While I’m brainstorming, I preview the map as an outline in Marked 2. Marked works with both iThoughts X and MindNode files. Simply drag the proxy icon (the little icon next to the document title at the top of the window) to Marked and it will begin showing the outline view of the map, updating on every save. In iThoughts you can modify the levels where headers become list items in the Export->Markdown settings panel. In Marked, you can switch between APA or decimal outline formats in the Gear menu at the lower right, or switch Outline Mode to “None” to just see the headers and subtopics as lists.
Once the ideas are out, I sometimes start writing paragraphs out right in iThoughts using notes on the related node. This can be handy, especially for getting started on very long pieces. In the same way that writing the exposition paragraph in the starter note makes getting started easier, these initial paragraphs get my brain moving on each section. It’s important for me to have the outline almost completely solidified and ordered before I start these paragraphs. Otherwise there’s a high probability that what I write there won’t make sense in the grand scheme of the post, and will be scrapped and rewritten anyway.
Writing
The whole development process above can take anywhere from 5 minutes to multiple sessions, depending on how many ideas I have and how complex the whole piece ends up being. Once I’m at a point where it’s time to start writing, I just export the mind map as Markdown (or copy straight from nvALT if it’s a simple one). In iThoughts, you can just select all (⌘A) and use Edit->Copy As->Markdown to get the outline ready to paste without going through a whole export-and-open process.
The topics are already there, broken into manageable pieces. I can work out one section at a time, or even individual paragraphs if my ADHD is especially crippling at the time. Aside from the built-in capabilities of MultiMarkdown Composer, I’ve developed a few other tools to make the whole blogging process easier. These include:
My app Marked contains myriad tools I’ve built for improving my own writing. It offers me a live Markdown preview as I write. I use it even in apps that offer a built-in preview (which MultiMarkdown Composer does) because of its immense flexibility. I can preview posts exactly as they’ll look on my blog, as well as see word count, reading level analysis, and more. It can highlight words and phrases that I want to avoid, indicate overuse of a word or phrase, and even help me check spelling and grammar.
My tool for easily creating Markdown links while writing. Using a simple syntax it can search iTunes, Amazon, Google, and more, automatically creating and inserting links from the best match without ever having to switch away from the editor. My Preview URL extension makes it easy to verify the results without leaving the editor as well.
I have quite a few useful TextExpander snippets for blogging, handling everything from adding Jekyll metadata (with fill-ins for variables) to properly capitalizing company names.
Jay Dixit, a recent guest on Systematic, shared some of his own writing shortcuts with me, and I’ve started developing a whole shorthand system in TextExpander. I’ve always used it for handling more complex things than I wanted to type, but with the new “Suggested Snippets” feature and some basic rules, I’ve found it’s great for typing out even my most common words2.
The set of OS X (macOS, sorry) System Services I’ve developed have long come in handy for everything from basic Markdown syntax to copying groups of links from my browser or other places. I also have an extensive set of key bindings that probably aren’t of interest to anyone who doesn’t obsess over keystroke efficiency.
So that’s most of my current set of tools, with an obvious lack of full iOS workflow. That’s going to have to be another post. If you’ve read this far, it’s likely that you—like me—have an insatiable curiosity about how other people are doing the things you do. Feel free to add notes and feedback in the comments!
Add “taskpaper” to the list of recognized extensions in nvALT->Preferences->Notes to see these in the list. ↩
I know, I know, that’s kind of what it was always intended for. ↩