I know mind mapping isn’t for everybody, but if it’s for you, I’d like to remind you that Marked 2 works with some of the major Mac mind mapping apps, bringing mind mapping, markdown, and writing together for some amazing workflows.
I’ve written about all of these integrations individually before, but it’s been a while and I’ve had enough people seem shocked to find out about Marked’s mind map capabilities that it seemed like a good idea to put the info out there again. This was originally written as a newsletter for Marked subscribers, but it got longer than any email I’d ever want to receive, so I’m turning it into a blog post for everybody.
If you’d like to stay up to date on Marked 2, please do sign up for the mailing list. It offers tips, tricks, and news, as well as special discounts on my various apps and products.
(If you run popup blockers, the “Marketing Consent” field might not appear. If you get a “Consent not given” error, please reload the page without blockers and check the box. GDPR stuff…)
My Mind Map Workflow
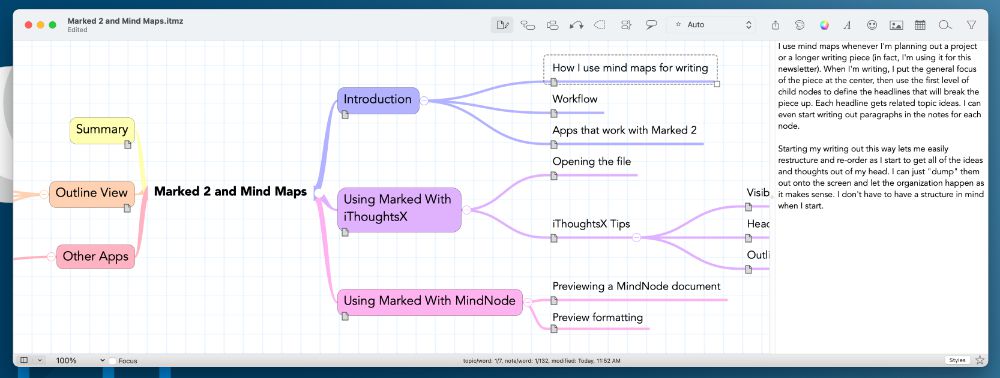
I use mind maps whenever I’m planning out a project or a longer writing piece (in fact, I’m using one for this blog post). When I’m writing, I put the general focus of the piece at the center, then use the first level of child nodes to define the headlines that will break the piece up. Each headline gets related topic ideas. I can even start writing out paragraphs (in Markdown, of course) in the notes for each node.
I’ve detailed my mind mapping techniques previously:
Starting my writing out this way lets me easily restructure and re-order as I start to get all of the ideas and thoughts out of my head. I can just “dump” them out onto the screen and let the organization happen as it makes sense. I don’t have to have a structure in mind when I start.
Want to see the a draft of this piece as a mind map? Check it out here. I exported to MindMeister for easy sharing, but it was all thought out in iThoughtsX as shown in the image above.
Two great apps for mind mapping on the Mac are iThoughtsX and MindNode (both also available through a Setapp subscription). And, great news, Marked works with both of these apps. You can open their maps directly in Marked and the preview will refresh every time you save your work.
Start your writing project in a mind map and keep track of how it’s coming together with Marked. You get all of Marked’s writing tools, including spell check, text analysis, and document statistics. When you’re done brainstorming and ready to start writing, just use Marked’s export palette (⇧⌘E) and choose Markdown as the format. Then you’re ready to dig in and start fleshing out the topics.
Using Marked With iThoughtsX
It was in 2014 that iThoughtsX added Marked 2 integration. They were the first to do so, and iThoughtsX is still my own preferred mind mapping tool.
To open your iThoughts mind map in Marked, just drag the .itmz file (the mind map document) to the Marked icon in the Dock or use File->Open. (My preferred way to work is to just drag the proxy icon from the iThoughtsX document’s title bar (to the left of the filename) to Marked in the Dock.)
Marked will display the contents of the mind map as a written piece, with headlines for the first level of nodes and list items for their children, including notes as paragraphs.
The preview will update automatically every time you save in iThoughtsX.
iThoughtsX Tips
If you go to Preferences->Advanced in iThoughtsX, you can change whether the Markdown export shows all topics or only visible topics. This will affect the Marked preview as well, allowing you to collapse nodes in the mind map to ignore them in the Marked preview.
To change the level at which headlines turn into list items, go to File->Share in your mind map and switch to the Markdown tab. Change the settings there and hit Save, then cancel the Save dialog. When you hit Save again on your mind map, those settings will be applied to the Marked preview.
You can also view your maps in decimal or APA outline modes — see the Outline View section below.
Using Marked With MindNode
I mentioned MindNode back in 2015 when they first added Marked 2 support. The integration has developed since then, and it works better than ever now.
To prepare a MindNode mind map for preview in Marked, open it in MindNode and then go to File->Advanced->Open in Marked (or press ⇧⌘M). This will initialize the Markdown preview and open the file in Marked automatically. From this point on, whenever you save the mind map, Marked will update the preview.
The first level of child nodes become headlines, child nodes beyond that are displayed as bulleted lists, indented for each level. Notes on each node are displayed as paragraphs within the list items.
Images in your mind maps (in both iThoughtsX and MindNode) will be included in the preview.
Using Marked With Other Apps (The Beauty of OPML)
Marked can also read OPML files, which most mind mapping and outline apps can export. Just export as OPML, then open the exported file in Marked. In most cases this means you’ll have to re-export the file when you want to update the preview (unless the app directly saves to OPML), but it allows you to make use of Marked’s writing tools when using mind maps to start writing projects in other apps.
Fun tip, Marked can also export a Markdown document as OPML, ready to import into almost any mind map or outliner app. You can easily round trip this to turn an existing Markdown document into an editable outline, modify it in your app of choice, then bring it back into Marked. That’s the beauty of OPML.
Outline View
If you prefer to see your mind map in outline view, you can use the Gear menu in Marked (in the lower right of the preview window). Select Outline Mode and choose Decimal or APA. Decimal outline uses the format 1, 1.1, 1.1.1, etc. for each level. APA (American Psychological Association) format (commonly used in university papers) uses a combination of letters and roman numerals to indicate levels.
After changing the outline mode, you may need to refresh Marked to update. Use Preview->Refresh or just hit ⌘R.
If you want to always open your mind maps in outline mode, open Marked Preferences and go to the Style pane. In the Layout and Typography section you’ll find the “Enable Outline for extensions:” field. Add the file extension for any formats you want to default to Outline mode, such as opml, itmz (for iThoughtsX), or mindnode. You can also define the default outline style while you’re there.
Give It a Shot
Hopefully this inspires some new writing workflow ideas for you. If you have any questions or suggestions for ways I can help you in your own workflow, just let me know!