When I need to get an idea out of my head, or I need to take that idea and flesh it out, I turn to mind maps. Some people scratch notes, others create outlines, but mind mappers like myself find that the format of a mind map is the most conducive to brainstorming.
Outlining is rigid and always makes me feel like things need to be in order. I can use outliners such as Tree effectively, but I find any outliner to be an impediment to the initial brainstorming process.
I like mind maps because they let me think non-linearly and because they allow ideas to “grow” in an organic fashion (see Tony Buzan and his “radiant thinking” ideas). Using applications to mind map instead of pencils and paper lets me do this without friction and creates projects that are easy to organize, even if I wait until the end to bother.
With a mind map, scattered thoughts begin to solidify before my eyes. A topic will inspire another topic, and I can start adding ideas and clarifying them as fast as I can think them. While I’m expanding one node, I’ll often randomly think of something related to the project but unrelated to the area on which I’m focusing, and I can just tack those on to other topics until I’m ready to focus on them. It’s a great way to remember everything that crosses my mind while I’m thinking about a project.
Mind maps are also an excellent overview of my thought process. I can shift pieces around and easily see what parts need fleshing out or reorganization. I can sort and categorize topics as I build, instantly shift a string of ideas into a new parent topic, move main topics around, even branch off another map on the side to capture irrelevant thoughts for later. If a parent topic gets overburdened with children, it only takes seconds to come up with relationships and split the idea up or add subcategories.
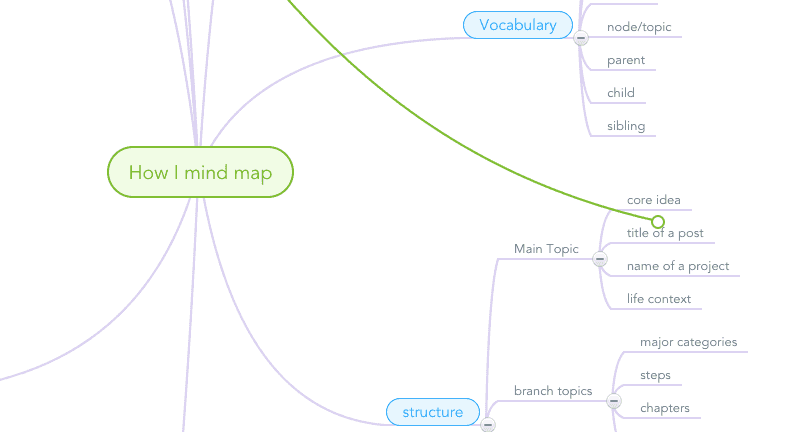
The terms
These are the primary terms I’ll be using throughout this post.
Map
A single Main Topic and its children. A mind map document may contain more than one Main Topic, but I’ll be referring to each of those individually as a distinct Map.
Main Topic
The central concept or subject of the map. In a radial mind map, this idea is at the center. In a top-down map, it’s the topic at the top. Everything branches from here.
Node/Topic
Every item on the map that isn’t an attachment, note, callout, or relationship is a topic. The terms “node” and “topic” are interchangeable, and depend on what application you’re working in.
Parent
A parent is any topic that has subtopics branching off of it.
Child
A child is any topic that branches from another topic. Every topic on a map, except for the Main Topic, is a child.
Sibling
Sibling topics are topics branching directly from the same parent.
Notes/Callouts
Some mind mapping applications allow you to add visible notes (callouts) and/or notes attached to a node that are visible in a notes panel or window when the node is selected.
Relationship
Most mind mapping apps allow you to draw lines between two topics and create a visual association between the nodes.
Boundary
A boundary is a section of nodes that has a clear delineation drawn around it. Many mind mapping tools have this capability. It’s simply a way to section off concepts or separate concerns.
OPML
Not necessarily a mind mapping term, but an important ingredient. OPML stands for Outline Processor Markup Language and is a popular format for sharing data between mind mapping and other applications.
The apps
This isn’t an exhaustive list of apps. These are the apps I use regularly. I’ve tried many apps on iOS and Mac, but only a few have met enough of my needs to be truly useful to me.
My actual mind mapping process usually starts at my Mac. I have random thoughts while I’m mobile, but they usually go to Drafts or straight into Notesy for later development. That said, I’d like to start by mentioning my top two mobile mind mapping apps: iThoughts and MindNode. They’re both great ways to get ideas out as soon as I have them, without needing to sit down at my computer, and they both easily translate between their companion Mac apps, as well as other formats. You can flesh out and polish a map entirely on iOS using either one, if that’s your preference.
As far as native Mac apps go, I default to iThoughtsX. It has all the extra tools (such as notes and annotations) that I need, and is half the price of Mindjet MindManager. It also doesn’t have the feature bloat that MindManager has been suffering from for the last few versions. The strongest runner up is MindNode Pro, and it’s not only easy to use and blazing fast, it’s the most elegant I’ve found as far as visual appearance and features like auto-alignment.
Curio is another great tool, and if I’m managing a project in Curio, its built in mind mapping tools are excellent, and its ability to copy a mind map as an outline, Markdown, or even OPML right from the workspace is delightfully handy.
I often use a web-based app that I’ve mentioned plenty of times before: MindMeister. It not only keeps all my ideas in one place, it offers live collaboration, sharing, and embedding of my maps. It has all the annotation features I needs and even tools like Geistesblitz and the “Wunder” set of tools for automatically finding images and notes to match a topic. I have a Fluid instance set up just for MindMeister on my Mac, and they have a great dedicated iOS app as well.
When I need an outliner, which usually happens well after the brainstorming stage, I like Tree. It offers a horizontal view of the outline that feels closer to a mind map than a standard outline. Mindjet MindManager also offers a live outline view of a map, which is a handy tool.
The structure
My process doesn’t necessarily follow the stricter rules of mind mapping, but it is a common process for people mind mapping with software instead of paper. It allows me to develop maps that export well to various formats and aids the process for whatever follows, whether it’s a software roadmap, a blog post or book, or simply an outline for a project or plan.
Journey to the Center of the Map
All maps start with the Main Topic, the idea at the center of the map. This is the core concept or subject of the map. It’s often a project name or post title, but sometimes it’s a “life context.” For example, if I’m trying to figure out how to achieve a goal, the Main Topic might be “sources of income” or “quitting smoking.”
I always use radial maps, as opposed to left, right or top-down layouts, as I find them the most conducive to my way of thinking. I arrange topics from the top right, clockwise, but I don’t usually worry about that until I get to the polishing stage.
Top-level topics
The first level of branch topics are major categories, steps, chapters, etc. If I don’t have these solidified at the time I start brainstorming, I just start dropping ideas and notes at the first level. As I go, associations and hierarchies begin to form and I can shuffle these top-level ideas under umbrella topics as I go.
As an example, this post began with the first-level topics of “why,” “structure,” “polish,” and “export.” In the case of a software roadmap, top categories would look more like “features,” “questions,” “notes/ideas,” and “future” (where I’d plan out version 2).
These first level topics have short names. They’re just categories that organize my thoughts. Keep in mind that it’s easy to move their subtopics between these major topics, and I can create a new umbrella topic at any time.
If a map is about a more abstract concept, I sometimes find that assigning images to these first-level topics can help me make immediate associations and help with distributing ideas quickly between categories. I often save this for the polishing stage, though, as images are more important to presentation than brainstorming for me. This goes against the basic rules of mind mapping, which dictate that images are more powerful than words, but that doesn’t always work well for me.
Further development
The second level of nodes—the children of the major topics—are where the ideas start to flow. These might be steps to complete the parent topic, subjects to cover in a section or chapter, or random ideas which relate to their parent. For this post1, these second level topics were the major subjects I wanted to cover in each section.
In most cases, these are still short, one or two word titles. If a map is simple enough, i.e., it will only have two or three levels, these may be sentences or nodes with notes attached.
The nitty gritty
The third level (and greater) is where I flesh out ideas. I usually don’t get to this point until I’ve finished brainstorming the second level and have it shuffled into place. If a topic at the second level only makes sense with a few children, though, I’ll go ahead and add them—as I go—as notes to be organized and thought out further when I get to this stage.
These can start to be more descriptive sentences at this point, as needed. I set up most of my maps to have bubbles around the first and second-level topics, but just underline branches by the third and fourth levels. This is purely a visual preference for readability. I rarely go beyond four levels because at that point it makes more sense to attach notes. If an idea needs more than a short sentence to explain, that definitely becomes a note.
If a map needs more than four levels, I usually split it off into “floating topics” or create a new map and link to it from a parent node. I’ve found that maps that get too deep become hard to read and harder to share. MindMeister and other applications make it easy to select a section of nodes and create a new map from them, leaving a link to the new map in their place.
Annotations
I prefer applications that allow annotations such as notes, callouts, and relationships. iThoughtsX has this kind of flexibility and power. Mindjet MindManager does, too, but I think it goes a bit overboard (and costs twice as much as iThoughtsX).
Notes are excellent for reminding myself what the final result of an idea branch was about. It’s entirely possible to create a map that won’t make sense to even me if I don’t touch it for a week. (I’ll cover that in more detail in a minute.) Notes usually exist as notebook icons on a node when viewing the map and require highlighting the node or double clicking the icon to reveal the text. iThoughtsX and MindMeister both have ideal note-taking tools. In the case of MindMeister, there’s even a feature that generates notes automatically, usually by linking an associated Wikipedia page and summary.
Callouts are short notes. They’re visible when viewing the map and usually have a different color. They attach via arrows instead of branches. I can use these to add notes or to point out information that doesn’t necessarily make sense as a child node.
Relationships are arrows drawn between two nodes. They can just be notes to myself, or create an expansion of a topic in a separate section by creating a path between ideas. A feature in one of my project mind maps, for example, might make the most sense under a specific section of “features,” but the details of its implementation might be more closely associated with another topic under “notes”. I can leave the feature topic where it belongs, then draw a relationship to the section of the notes that it belongs to without having to move it or repeat it elsewhere. In addition to iThoughtsX and MindMeister, which both handle this well, MindNode Pro has elegant relationship handling.
The Process
As mentioned earlier, I usually start and end my brainstorming process on my Mac. It’s easiest for me to fly through ideas if I have the speed of a full keyboard. I also like the ability to multitask, keeping notes on the side and browsing the web for extra information without leaving my mapping application.
I also prefer using a Mac mind mapping application to anything I can do on paper. Paper is hard to organize and requires more thought before I put something on it. That may be great for well-considered writing or other creative processes, but for brainstorming it’s a killer. I need to be able to toss out ideas without considering whether I’ll need to erase them later, and being able to quickly cut and paste or drag ideas around is paramount to making real use of a map.
If I start on my iPhone or iPad, it’s usually just a quick note and a few nodes to remind me what I was thinking. Then, using any of the available transport methods, it gets put into my mind mapping application of choice. Sometimes this is as simple as iCloud sync between iOS and Mac apps, and sometimes it’s a bit more involved with exporting OPML and importing it elsewhere or converting a text outline from a Markdown note into a mind map.
Brainstorm
Either way, the process begins with ideas, which are often random thoughts. Typing them out almost always leads to more thoughts related to the one I just typed. Sometimes it leads to more thoughts that relate to another idea I’ve already typed, and it’s easy to just pop them out and then move them where they make the most sense. That kind of multi-threaded thinking is a major benefit to mind mapping for me.
I don’t spend a lot of time sorting as the ideas come out. I put them where I’m working in the map and move them as soon as there’s a breaking point in my thought process. The radial nature of a map makes it easy to quickly switch focus and brainstorm a particular idea further, all while still considering other parts in the back of my mind.
On-the-fly organization
If a second or third-level node gets enough child topics to warrant being a higher level node, I’ll promote it as I work. This is usually just a matter of dragging the parent node and attaching it to its parent’s parent node, putting it at the same level as the parent. Sometimes doing this makes sense, sometimes it doesn’t, depending entirely on the topic. If it’s not obvious, I just leave it. There’s plenty of time for re-organizing after the initial brainstorm.
I usually leave relationships for the organization and polishing steps, but sometimes drawing a quick relationship between nodes is a great way to leave a breadcrumb trail for my thought process. These interim relationships are often removed during the reorganization process, as they become irrelevant once everything else is in place.
Most mind mapping applications allow for “floating topics.” These are nodes that are not connected to the Main Topic, essentially creating multiple maps in one document. I often create a floating node that becomes a temporary container for ideas that don’t have a category yet, but don’t make sense as top-tier ideas. I’ll stash them in the floating topic and pull them where they need to go when it makes sense. Sometimes these topics are just removed as they become irrelevant or integrated into other, more concrete ideas.
Sort
Once I feel comfortable that all my initial ideas are out of my head and into the map, it’s time to sort them. This is simply a matter of examining the topics, starting from the inside, and moving nodes between parent topics or promoting/demoting them in the order.
While I’m sorting, I’ll often have more ideas or see ways to clarify or combine nodes. This is still part of the brainstorming process. Sorting just helps me begin to review what’s there, and the act of doing it often sparks new realizations. It’s an initial review of the project or idea, but everything is still fluid and dynamic.
If the map contains concepts that need to be presented or exported in a linear fashion, now is the time to start setting that up. I organize my maps from the topmost idea on the right, moving clockwise. Most mind mapping apps don’t put nodes straight above the main idea, but if they do then that’s my first topic. Within each level of nodes branching from the main topic, I sort ideas from top to bottom.
Once I have the map sorted and the “aftershock” ideas fleshed out, it’s time for the official review.
Review
Another beauty of mind maps is how easy they are to review. Note that—at this point—this is generally only true for the person who created the map, and only if I do the review before I forget the whole process that led me there. In their early stages, mind maps can quickly become incomprehensible. This review stage is where I take the time to make sure that everything will make sense the next time I or anyone else opens the map.
I find that during the process of brainstorming, early ideas often become unclear or irrelevant as the total map solidifies. The review stage is important because I need to clarify or weed out ideas that don’t fit into the finished map.
Reviewing begins the same way as sorting, working from the inside of the map to the outside. I take each branch one at a time and read through the associated topics. If everything makes sense, great, but I’ll usually find outdated thoughts (i.e., “So five minutes ago”) or ones more related to another parent topic. Barring the need for further sorting, this is the time when I begin to draw relationship lines connecting nodes that belong under more than one category and are already fleshed out in another section.
Sometimes early ideas get repeated unnecessarily. I weed these out with prejudice. Repeated ideas across multiple sections water down the concept and only lead to confusion when looking at the map later. I remove duplicates, leaving the one where it makes the most sense, or I find ways to merge ideas that avoids replication.
By the time I’ve finished this review process (and it generally doesn’t take long), I’m confident in the idea and have a clear goal for where to go next. If I don’t feel like that by this point, I’ll usually let it go or save the map for reviewing another time.
Polish
Polishing a map is what makes it useful. It helps me visualize the final concept in its entirety, and provides additional information I need to implement the idea. It makes the idea conveyable to others, and—in the case of project planning—allows me to prioritize and delegate tasks and actions.
Tweaking the look
First, I take a look at the visual aesthetic of the map. Did the template I used allow for each level to be clear in its purpose? Perhaps I need to add bubbles to the third or fourth level, or adjust colors or fonts to add clarity and delineation. I have templates set up that allow me not to think about these considerations up front, but when it comes time to complete (or present) the map, tweaking is a good thing.
Color is the ultimate tool for making an easily scannable map. I love apps that do automatic rainbow coloring for each main branch. iThoughts and MindNode both do this well. In the polishing process, though, any of the good apps available will allow me to apply colors to branches to separate them. I can even use the same color on related branches to associate sections. This is most useful in cases where boundaries aren’t available.
Icons and images
Icons are a great tool for polishing and presenting. Use colored flags, numbers, thumbs up/down, smiley/frowny faces, and other designations to direct attention, prioritize the topics, and provide starting points for feedback. iThoughts, MindManager, and MindMeister all offer this functionality.
Images are also an easy way to describe some topics. Sometimes there is no image that makes sense to me, but when there is, adding images at the first or second level can help clarify a map and make it easy to scan. MindMeister’s WunderImage tool will even do an automated image search for an appropriate representation.
Notes and attachments
I should note at this point that Mindjet MindManager does well with text tagging. I can add hierarchical tags to nodes based on my own custom tagging dictionary, then filter the map based on those tags. It’s a powerful tool that none of the other apps have picked up on yet.
If I haven’t already added notes to topics, I’ll go through at this point and jot down any explanations I think are necessary. I’m possibly overzealous about this, but I’ve found many times that I can flesh out an idea to its full extent, then load the map up a month later and have no idea what I was talking about. Links and references to things that are on my mind but may fade over time are also essential.
Export
There are several directions I can take a mind map after I’m finished with it. Sometimes I can just take action using what I’ve discovered while creating the map, but usually a map leads to the next phase of a project.
Writing
Most of my favorite apps for creating mind maps can export the map to OPML. Some (like iThoughts) can even export directly to Markdown. If I’m preparing to write, exporting the outline to MultiMarkdown Composer—which can read OPML—is the next step. After conversion to MultiMarkdown, I can also send the outline to Scrivener.
If my topics are properly sorted in the map, I have an outline that’s ready to start filling in. My notes from the map can even show up as starter text in my Markdown file.
Presentation
If I’m presenting the topic of the map to others, there are great tools available for creating slides. MindMeister and Mindjet MindManager both do an excellent job of creating dynamic presentations. iThoughtsX exports to PowerPoint format, as well.
MindMeister’s presentation mode is my favorite. I can quickly (even automatically) create dynamic slideshows with zoom effects that move around the map, highlighting sections I want to talk about and allowing a virtual tour of the concepts.
Notes
A lot of my maps become notes for future reference. My maps on MindMeister sync back to nvALT using some custom scripts (and save a PDF version locally as well). Exporting any map to a Markdown file makes it easy to drop it into nvALT, Evernote, or other note-taking systems. A link back to the original file or URL for the map is always a good idea.
Roadmaps and outlines
If the map is the beginning of a coding project or destined to be an outline, I’ll usually export Markdown and convert it as needed to TaskPaper format. That’s what I use for individual coding projects. I’ll add tags as needed and start developing features based on the brainstorm and organization of the ideas.
Adjustments and additions
While I’m working on the next phase generated from my map, new ideas will happen and revisions will need to be made. I don’t go back to the map at this point, I just incorporate them into the writing, presentation, or notes phase.
Go for it
Mind mapping is, for me, the most powerful brainstorming tool available. The speed at which I can get ideas out and start working with them makes it perfect in a variety of projects and situations. I encourage you to develop your own method, but the basics that I’ve covered here are a good start. Dump everything in your brain out, organize on the fly, then review, sort, and polish. Have fun mind mapping!