NiftyMenu
NiftyMenu copies the entire menu hierarchy from any Mac application, turning it into an HTML playground. It’s designed to make taking screenshots of menus for software documentation easier. And it does that. If that’s what you need right now, that’s amazing, this will be super useful. If you don’t fall into that microscopic niche, it’s just a neat trick that might be worth seeing…
Check out the demo to see what’s up. Find the latest release in the repository.
Why did you do this. Why.
I got annoyed for five minutes while taking a screenshot one time. So I’m obviously going to spend a couple hours finding a workaround.
To elaborate…
The Problems With Menu Bar Screenshots
- Menus disappear as soon as you move your mouse away. Assuming best case scenario and your screenshot app has a hotkey, you can hover over it and grab the image, but if anything is wrong you have to relocate and hover the item again. Not a huge deal, but the time adds up.
- It’s a difficult process to automate. Dealing with System Events and accessibility scripting alone is exceedingly painful, but for people writing documentation you can be sure that menu items will move and even change names over time, rendering careful menu scripting moot.
- You can only shoot image sizes up to the resolution of your screen, and the images won’t zoom without pixelation.
- If you want to add callouts you need to do it in post with an image editor. Which is also impossible to automate if you can’t guarantee the item’s location in the shot with 100% accuracy.
- Tasks like setting up the right Desktop image and Dark Mode settings are more time consuming than I’d like.
Requirements
The only requirement is the MultiMarkdown CLI. You can install this with Homebrew (brew install multimarkdown) or download a package from the MultiMarkdown releases.
Getting Started
You can clone the repository if you think you’ll want updates, or you can just download the latest release.
You need the entire package, and the script runs inside of the root folder. If this were a more useful project I’d bundle it up as a gem, but for now, just clone or download the zip and switch into the niftymenu folder.
Run the script with the name of a running application as the argument.
To duplicate Pages menus to a browser playground, launch Pages and run this from the niftymenu folder:
./niftymenu.rb PagesWhen it finishes, it will offer to launch the page in a browser. You can choose that, or cancel and open the HTML from the dist folder. All pages will be built to that folder, and will only work from that location.
You can play with a hosted demo from the above command.
Using the Playground
Load the page in any browser. The menus work exactly like what you’re used to, expanding on hover as you navigate. But when you click an item, you lock the expanded menus in position. Clicking again (or clicking anywhere else) releases them.
Add callouts by double clicking to highlight an item, or hold Option and click to add an arrow. If you option-click on a keyboard shortcut instead of the menu title, it will add a callout to the shortcut instead of an arrow. AppleScript didn’t provide NiftyMenu with any indications about whether the element had a checkmark originally, so if you need to add those in for your screenshot, use Command-click to toggle them.
There are settings available in a slide-in menu in the lower right.
Use keyboard shortcuts for quick toggles:
| Key | Function |
|---|---|
| ⇧D | Toggle Dark Mode |
| ⇧E | Toggle Exposé |
| ⇧S | Take Screenshot (Chrome only) |
| ⇧? | Toggle the Help Search |
Features
(Nearly) Perfect recreations
Generate a fully-functioning duplicate of any app’s menu bar in your browser, with features designed for writing documentation and walkthroughs.
Click any item to freeze the menu
Hovering will open up submenus, but once you click an item the submenu will stay open, and all of the proper highlights up the chain to the top level will stick. Now you have time to set up your screenshot.
Add Callouts
If you double-click a menu item, it gets highlighted as the selected item with an additional contrasting halo around it. Shift-double-click to highlight the entire hierarchy of clicks to that menu item.
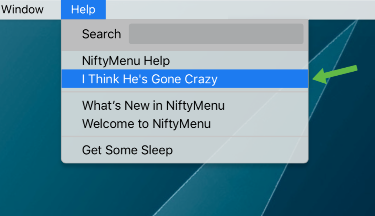
You can add an arrow to the right of the selected item by Option-clicking it. Add a callout to a keyboard shortcut by Option-clicking on the shortcut.
You can also toggle the standard OS checkmark on the left of the item using Command-click. The arrow style (circle or arrow) can be toggled using the preference controls.
Zoomable
Using the browser’s standard zoom functions, you can zoom the menus in until they fill your screen. Better quality images than a 3x display, even on a 1x…
Light and Dark mode
Yes, there’s a utility menu at the bottom that lets you switch to Dark Mode, and even changes the Desktop background for you. You can also get to it by pressing Shift-D.
Exposé
Pressing Shift-E or selecting Exposé from the utility menu will open all of the menus at once, spreading them out for easy visibility and scanning.
Custom Wallpaper
Use the tools menu to select your own wallpaper, or to grab a random one (optionally based on a keyword search) from Unsplash.
Customizable colors and Desktop images
Every color in the menu bars is customizeable without modifying the original files. Desktop gradients and optional wallpaper images, too.
Fully functioning menu search
On your Mac you probably use ⌘? to open the Help menu’s search field when looking for menu items. I do too, so I made it work in NiftyMenus. Just press the question mark (Shift-/) to focus the field and start typing. It’s a fully fuzzy search with weighted matching, so it will generally nail what you’re looking for with a random string of letters.
Escape will clear your search and hide the Help menu. Pressing return while a match is highlighted will scroll the screen to that match.
Built-in Screenshots
html2canvas is built in, but the screenshot capability currently only works properly in Chrome. In Chrome you can use “Screenshot” in the tools menu to snap a cropped photo containing the currently-focused menu item, automatically named and ready to save to disk. This capability is also available from the API for automation.
In Chrome, you can select the target menu item, add any desired callouts, then just hit “Shift-S” to capture a screenshot.
NiftyAPI
Search and select menu items with simple API methods. Any automation method that can interact with a web browser (AppleScript, browser testing platform…) will make it possible to script and capture a dozen screenshots with the click of a button. Even if those menu items move around. See the API documentation.
The API is chainable, so you can run something like:
NiftyAPI
.config({
    darkMode   : false,
    bgImage    : true,
    arrowStyle : 'arrow',
    wallpaper: 'https://cdn3.brettterpstra.com/uploads/2020/05/uDTexture0015.jpg'
})
.find('edit/paste as').arrow().shoot('paste-as@2x%%r1000oh')
.find('format/convert selection').arrow().shoot('convert-selection-to@2x%%r1000oh')
.find('format/cleanup').arrow().shoot('format-cleanup@2x%%r1000oh')
That will set up appearance options, then find the target menu items, select them and add an arrow, and take screenshots of each.
The Terminal is opened by hitting $ while viewing a NiftyMenu HTML page. Paste JavaScript into it and hit Run. The pasted text will be split at semicolons and trimmed, run one “command” at a time. Because the NiftyAPI is all about chaining, you can write the entire script as one “command.”
I just keep the above snippet in a text file in the same folder as my Markdown documentation, updating it as I add new screenshots. Whenever I paste it into the Nifty Terminal ($) and run it, it instantly saves the updated screenshots to Downloads (occasionally shooting so quickly that I have to tell Chrome to “allow multiple downloads”). The weird %% suffixes on the specified filenames trigger a Hazel rule that then creates 1x and 2x versions, optimized and ready to move to my documentation folder.
To fully automate this process via scripting, check out CurlyQ and the
executecommand.
Automating
NiftyMenus is scriptable using JavaScript in the browser, so it can be automated with various tools. I use straight up AppleScript with a bunch of routines I’ve written for exactly this purpose. Focusing a menu item is as easy as:
tell application "Safari"
    tell current tab of window 1
        do JavaScript "NiftyAPI.clear()"
        do JavaScript "NiftyAPI.find('file/open').callout(true, true)"
    end tell
end tell
Some web testing tools (with automation and screenshot capability) have some potential for this. I could see a workflow with Fake and Retrobatch making this work. I’ll leave that part up to you, but I’ll add some of my AppleScript examples to the repository.
Customizing
The project uses Sass/Compass for styling and is configured to output your modifications to the right place, so styling is pretty easy.
You can modify Sass variables in the custom folder (sass/custom/_variables.scss) to change any of the colors and the Desktop images. There’s an empty _custom.scss file that Compass will import automatically, so you can override anything you want without breaking your ability to update. Just install Compass (gem install compass) and then use compass compile from the base folder (or compass watch with LiveReload to see your changes instantly).
Editing the JavaScript is more difficult. I’m using CodeKit for development, so there’s currently no build system (gulp, webpack, or the like) included. The CodeKit config file is there if you happen to have it installed. If you want to tweak the JavaScript, feel free, but you’re on your own. Pull requests are welcome if you do dig into it.
Feel free to post questions, ideas, and corrections in the Issues section.
Shortcomings
- Occasionally disabled menu items don’t make it to the final output (yet they do on the next run… mysteries)
- I can’t easily blur the background of the menus, so my attempts to mimick Apple’s interface transparency fall a bit short
- Probably a ton of minor styling tweaks that I’ll get to over time
Credits
I adapted an AppleScript from the Macscripter formus, originally credited to squaline, emendelson, and Nigel Garvey. I stripped it down a bit and tweaked the output to aid in my conversion to Markdown, but by and large this whole system is heavily dependent on their work. It would have taken me months to figure that one out on my own.
Changelog
Click to expand
1.0.9
2023-05-03 12:05
IMPROVED
- Update submenu indicator for Ventura styling
- Reduce font size for Ventura visible compatibility
- Better font stack for macOS system font
1.0.8
- Update submenu indicator
1.0.7
- update docs
1.0.4
- force wallpaper update when switching dark mode
- reload page after expose to restore width
- reorder submenu
- menu transparency in dark mode
1.0.1
- Refactored all JS code
1.0.0
- Rewritten JavaScript API
- Keyboard shortcuts in menu
- Customizable desktop images
0.1.4
- js api touchup
- Adds keyboard shortcuts in menu
0.1.3
- Click behavior, demo tutorial
- Better callout handling
- Onscreen tutorial for demo pages
- Position arrow callout on left if item has submenu
0.1
- Initial release
Speaking of NiftyMenu…