 VoodooPad is a powerful note-collecting, wikifying, productivity machine. With the right scripts, you can make just about anything happen, at least within the realm of text, images and web pages. VoodooPad has a built in web server, and can export your notebook as a full website, with links intact. I like the web export the best, because it gives me a crazy amount of control over the output. To that end, I built a website using nothing but VoodooPad, hopped up on some custom scripts. I can update it just by editing in the awesome auto-linking editor, and click one button to update my live site. That’s what this post is going to be about.
It’s showing its age (I’ve come to loathe the design), but the site I’m talking about is the Blogsmith Bundle Documentation site. Peek around, you’ll see how easily everything gets cross-linked and how quickly you can navigate a fair amount of information. Keep in mind that you can make a VoodooPad site look any way you please, don’t judge the possibilities based on my aging design.
Why would you want to do this? Once you get the pieces in place (it’s no more complicated than any other ground-up website build-out), it’s a great way to statically generate up-to-date content. It’s easy to make changes to existing content and update the live site with the click of a button, plus VoodooPad is flexible enough to allow for separate testing and production output. Page links are always current and automatically update as you change things around, and the Wiki-linking features of VoodooPad make it great for reference content. Which leads to the second question…
What kind of website is right for this? Well, if it makes a good VoodooPad document, and doesn’t need to do anything terribly dynamic, it’s probably a good candidate. Remember that the output from VoodooPad is going to be flat (all in one directory), so if for some reason your proposed website requires a directory structure, you’d be better off building it another way. With that said, the flat structure has never been an issue for me; I do all of my organizing and editing in VoodooPad for this site, visual modifications are made in the template, I have automated scripts for pushing content live; I never actually touch the myriad files in that directory.
Read on for some nitty gritty…
Getting started
First, I built the whole notebook in plain text, using Markdown. VoodooPad does a pretty decent job converting Rich Text to HTML, but if you’re as picky about markup as I am, using Markdown on plain text is the way to go. There’s a Markdown plugin available in VoodooPad, but I really wanted to use MultiMarkdown to get tables, footnotes and more. Unfortunately, I didn’t find a way to make MultiMarkdown blend within the VoodooPad workflow, but I did find Python Markdown Extra, which turned out to be perfectly workable for this task. We’ll get to that in a second.
Notebook tips
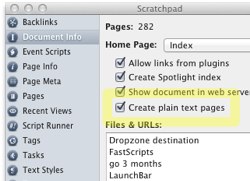
- Use plain text. Open your Document Info palette and have VoodooPad start each page as plain text. Wiki-links and everything will still work fine, and VoodooPad will render those to HTML when you export. No sweat. But we’re working in Markdown here, so avoid any of the Rich Text formatting capabilities of VoodooPad.
- I’d also recommend you turn off Smart Quotes; our scripts will smarten your straight quotes into web-friendly entities on the way.
- For Markdown, setting Tab to insert four spaces is a good idea in the Editing preferences as well.
- Don’t use titles in the page. If possible, cover that in your template; it will help you consistently use titles as
<h1> or <h2> headers in the same location on every page.
- Use a default page template. Create a page called “NewPageTemplate” and put in any elements you’d like on every page. This will be called every time you add or link a new page. Mine’s blank, and all of my repeated elements are handled in my template. It’s just handy to not be erasing unnecessary clutter when you’re ready to write a new page.
Python Markdown
Installing and setting up Python Markdown gives you the ability to add classes, ids and other markup elements that will make actually designing a template a lot more fun. Python has an easy_install command, and you can run it to add Markdown Extra to your local library:
To make sure your Python path is set to include your site packages, ensure that there’s a PYTHONPATH line is in your .bash_profile:
PYTHONPATH=/Library/Python/2.7/site-packages...
Yours may be longer, but it needs to have that path (or a path for a different version) in it. On Snow Leopard I ended up having to symlink my 2.6/site-packages to the 2.5/site-packages directory due to some weirdness with my Python install and the way that VoodooPad looks for packages. On Lion and Python 2.7, though, it seems to run fine without any persuasion.
Now you’ve got the power of Markdown Extra for your web export. It’s very similar to MultiMarkdown/PHP Markdown Extra, and has support for tables, fenced code blocks, code highlighting, footnotes and more. See the Python Markdown Extra homepage for syntax documentation, and be sure to browse the extra extensions available.
Special Pages
The Index
If you create a page called “index,” it will become “index.html” or “index.php” (depending on your settings in the export). Either way, this will become your home page. You can manually edit it, which is preferable in the case of a static website, or you can create scripts to generate lists of the latest content, etc. I’m using it to manage a static site, so I don’t have any dynamic content generators ready for you. You can take what I do have for some of the other scripted pages and modify… if you’re adventurous enough to be trying this out, you’re probably adventurous enough to brave some Python.
Creating a sitemap with excludes
I have a Sitemap script that runs whenever I load up a page tagged “sitemap” (there’s only one page with that tag, but you can see the possibilities).
Create a new page called “ScriptSiteMap” and add this code:
page = eventDictionary['item']
document = windowController.document()
if "sitemap" in page.tagNames():
  thelist = ""
  textView = windowController.textView()
  for key in document.keys():
    a_page = document.pageForKey_(key)
    if "excluded" not in a_page.tagNames():
      thelist = thelist + "* " + a_page.displayName() + "\n"
    page.setDataAsString_(thelist)
In your Event Scripts palette, add a new script under “Page opened.” Point it to “ScriptSiteMap.” Now create a blank page named Sitemap and tag it with “sitemap”. Whenever you load open that page now, it will generate a sitemap for the entire site. It can be slow once your site gets large, but you’ll want to open it after adding new pages and before exporting.
You’ll note that I have a line in scripts like this that looks like:
if "excluded" not in a_page.tagNames():
This way, I can exclude pages from being included in dynamically-generated content just by adding an “excluded” tag to the page. All of my scripts, notes, todo lists for the site, etc. are tagged “excluded” and don’t show up in any menus on the site.
You can include any page’s content in your template using the “#include” tag. This is handy for, say, a sidebar that you want to manually curate (or generate with a script). Just put the display name of the page into a tag like this in your template:
That’s it!
If you add the appropriate javascript (etc.) to your template, you can easily include video and audio in your site. Just put the straight markup needed into the page in VoodooPad and Markdown Extra will pass it through to your site. I actually embed movies directly in my VoodooPad document so they just output into the main folder, then I can include markup like this in a page:
<video id="movie" width="700" height="394" preload controls>
  <source src="optshift4.mp4" type='video/mp4; codecs="avc1.42E01E, mp4a.40.2"' />
  <source src="optshift4.ogv" type='video/ogg; codecs="theora, vorbis"' />
  <object width="700" height="394" type="application/x-shockwave-flash"
    data="flowplayer-3.2.2.swf">
    <param name="movie" value="flowplayer-3.2.2.swf" />
    <param name="allowfullscreen" value="true" />
    <param name="flashvars" value='config={"clip": {"url": "optshift4.flv", "autoPlay":false, "autoBuffering":true}}' />
    Download video as <a href="optshift4.mp4">MP4</a>.
  </object>
</video>
That creates a page like this.
Creating a custom template
The next thing you’ll want to tackle is a custom template. Find your “Web Export Plugins” folder at ~/Library/Application Support/VoodooPad/Web Export PlugIns and duplicate one that feels like a good start. You can always start from scratch once you understand the basics; working from a copy will ensure that you have all the building blocks to begin with. Right click on your copied template and “Show Package Contents” to open a new window and see what’s inside (or just head there in Terminal and open the whole folder as a project in your favorite editor).
For the most part, it’s just HTML, CSS and JavaScript (if you want), so have at ‘em. Just pay attention to the existing variables that will insert the rendered content. $page$ is the main one to be concerned with, but there are other variables available.
My output was originally all HTML, but I recently modified it to output PHP extensions and made my template use PHP to include a header and footer. This makes it really easy to make changes to the layout portions of the markup, as well as the linked scripts and styles, without having to re-export every time. I won’t go into detail, but if you know a little PHP, it should be easy to figure out.
I added some jQuery, and used animation, ColorBox and footnote hover bubbles. If you keep your scripts, css and images in subdirectories, copying them into your final export is a lot easier. You’ll find a postflight.sh script in your theme’s folder, and if you open it you’ll see where you need to specify what files to copy out with the export. Mine looks something like this:
#!/bin/bash

SRC_DIR=`cd "${0%/*}"; pwd`
cp -r "$SRC_DIR/images" "$VPWebExportOutputDirectory/."
cp -r "$SRC_DIR/scripts" "$VPWebExportOutputDirectory/."
cp -r "$SRC_DIR/css" "$VPWebExportOutputDirectory/."
cp "$SRC_DIR/favicon.ico" "$VPWebExportOutputDirectory/."
Web Export Script
Once you’ve got a template ready, it’s time to add some scripts to the document. I should warn you ahead of time that I’m still learning my way around Python. While these work, there may be more elegant ways to do this.
Create a page in my site document called “ScriptWebExport” that contains the following:
global re
import re

import markdown
import smartypants

# Grab the page from the current event (Web Export will markup page)
page = eventDictionary['item']

# Get the text of the page as a string
content = page.dataAsAttributedString().string()

# Remove some content before processing, in this case my todo items
output = re.sub(r'\[TODO\] .+', '', content)

# run the markdown module on the content, including or excluding any extensions desired
# you can just include 'extras' to get them all, instead of loading each individual extension
html = markdown.markdown(output, ['footnotes(PLACE_MARKER=+++footnotes+++)','headerid(level=2)','def_list','abbr','tables','fenced_code','codehilite'])

# return the Markdown Extra-processed page to be passed on for additional VoodooPad markup and linking
eventDictionary['itemMutableAttributedString'].mutableString().setString_(smartypants.smartyPants(html))
Now you just need to open up Window->Palettes->Event Scripts and add a new script under the “Web export will mark up page” trigger. Set it to the “ScriptWebExport” page and choose the Python interpreter. With a template ready and your Markdown Extra rendering, you’re ready to go.
Web Export
Now you’re ready to export. You can go ahead and test it out (File->Export Document->Web Export). Choose your template and pick a folder for the files. If you’re outputting php extensions, make sure you’re putting them somewhere you have php-enabled access to. Files with an html extension will load up in your browser no matter where you put them. VoodooPad exports your entire site “flat,” meaning it’s all in one directory. It’s easier this way, and since you’re doing all of the content management in the VoodooPad environment, you don’t really have to worry about it. Your theme can store includes, css, images and scripts in subdirectories.
This part is entirely optional, but I run a postflight script (set in the Web Export panel) that updates a git repository and pushes it to the live server after an update. I have two presets, one that pushes and one that doesn’t; deployment and development.
Here’s the script I use:
#!/bin/bash

cd "/path/to/my/export folder"
git ls-files -o | git update-index --add --stdin
git commit -am "Updating the VoodooPad website on `date`"
git push origin master
This does an automatic update and commits any files that have changed, were added or have been deleted. It’s a nice backup, too, just in case you exported something you weren’t ready for. Then I have a post-receive hook on the origin server that pushes out a copy of the latest changes to the web directory automatically.
You could accomplish much the same thing with Docksend in Transmit or just by outputting your documents to a mounted server folder. Have a preset for saving to a local folder for testing, and one for pushing to your remote folder in whatever way you prefer.
In Closing
Well, that’s my best shot at sharing what I’ve learned managing a website with VoodooPad. It’s not right for every situation, but it’s great for handling documentation and informational websites that change regularly and are well-suited for the kind of inter-page linking that VoodooPad makes so easy. I’ll be curious to hear if this sparks anyone’s imagination… can’t wait to see your site!
