We’ve covered a small truckload of Bash scripting ideas for Mac and OS X in the previous two posts. It’s time to put them to use and create an Automator app that we can use as a droplet in Finder. If you skipped straight here, it probably means you don’t really want to know about the messy details of the scripts, so this post won’t go into a lot of Unix mumbo jumbo.
You can download ready-to-go versions of the workflows covered in this post here: GrabIconWorkflows.zip.
If you want to customize these workflows, you’ll need to know a little bit about the inner Bash workings, but nothing an up-and-coming nerd can’t figure out. To get started, open up Automator.app and create a new file with the “Application” preset.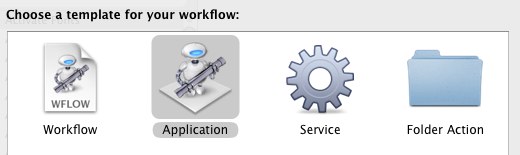
A basic workflow
We’ll start with a really simple Automator application that you can drop an application onto to extract its icon at 512px and save it as a JPEG to the Desktop. One step, no interaction.
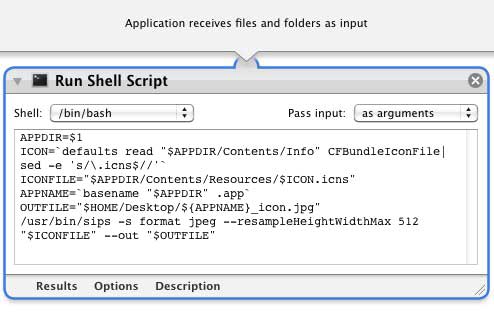
In your new Automator workflow, find “Run Shell Script” in the Library on the left. You can use the filter at the top to quickly narrow down the choices. Drag the action into your workflow editor on the right, and paste the following code into it:
APPDIR=$1
ICON=`defaults read "$APPDIR/Contents/Info" CFBundleIconFile|sed -e 's/\.icns$//'`
ICONFILE="$APPDIR/Contents/Resources/$ICON.icns"
APPNAME=`basename "$APPDIR" .app`
OUTFILE="$HOME/Desktop/${APPNAME}_icon.jpg"
/usr/bin/sips -s format jpeg --resampleHeightWidthMax 512 "$ICONFILE" --out "$OUTFILE"
Make sure the shell is set to “/bin/bash” and change “Pass input” to “as arguments”. Save the workflow. You’ll probably want to name it something creative and put it somewhere useful, such as ~/Applications/512Desktop.app. I have the utmost faith that you’ll come up with something brilliant. Here’s what your workflow should look like:
Now, you can just drop an application onto the icon for 512Desktop.app and the extracted icon will show up on your Desktop, named based on the name of the application you dropped on the workflow, with “_icon.jpg” appended to it. That was easy, right?
A complete workflow with user interaction
To make something more universally useful, we’ll create a workflow that asks the user where to save it. This time, we’ll output a PNG file and use the maximum available icon size. We covered how to do both of these in the last post, so I won’t go into all of the details in this one. Page back if you’re curious (or confused).
We’ll also need to store variables and pass multiple arguments to shell scripts in the workflow to pull this off. This is the stuff that makes Automator both awesome and frustrating, but once you get the hang of it, new possibilities open up. In this example it may seem like a lot of work just to ask a user where to save a file, but the concept allows you to get user input (without using AppleScript) in shell scripts. It’s worth knowing.
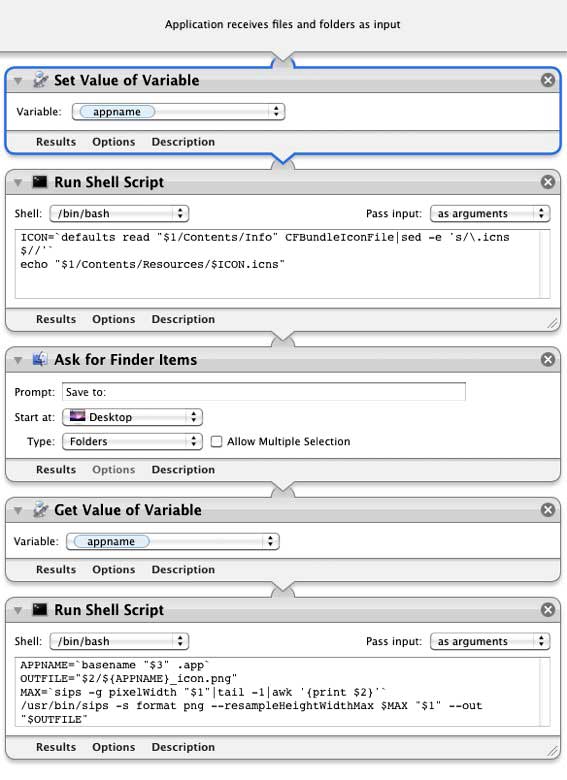
Create a new Automator application, just like above. Since this is going to be a droplet, the path of the Application will be passed to the first action when you run it (by dragging an app onto it). We need to store that as a variable for later, and then pass it on to the first shell script. To do so, drag the “Set Value of Variable” action from the library into your workflow. Click the dropdown for “Variable:” and choose “New variable”. Title the variable “appname”.
Next, drag the “Run Shell Script” action in after the variable action. Paste the following code into it:
ICON=`defaults read "$1/Contents/Info" CFBundleIconFile|sed -e 's/\.icns$//'`
echo "$1/Contents/Resources/$ICON.icns"
This gets the icon file’s name and hands it back to Automator. We’ve got the application name and location, as well as the name and path of the icon file we need. We just need to know where the user wants to save it to. Add the “Ask for Finder Items” action in next, and set the prompt to “Save to:”. “Start at:” should be set to Desktop by default, but you can modify that to open the dialog to whatever directory makes sense for you. Change “Type:” to “Folders” and make sure that “Allow Multiple Section” is unchecked.
Now we need our appname variable back, so drag “Get Value of Variable” in as the next action. Set “Variable:” to “appname” (which will be available in the dropdown). The outputs of each command stack up, so now we have the icon file path, the user’s destination selection and the Application’s name (appname) all ready to pass to the final shell script as arguments ($1 $2 $3).
Drag in a “Run Shell Script” action as the last command. Again, set it to “/bin/bash” and pass input as arguments. Then, paste this code into it:
APPNAME=`basename "$3" .app`
OUTFILE="$2/${APPNAME}_icon.png"
MAX=`sips -g pixelWidth "$1"|tail -1|awk '{print $2}'`
/usr/bin/sips -s format png --resampleHeightWidthMax $MAX "$1" --out "$OUTFILE"
Here’s what it should look like now:
Done. Save the workflow to a file such as ~/Applications/SaveMaxIcon.app. Try dragging an application directly onto it. You’ll be asked to choose a folder. Click “OK” and the resulting icon image file will show up in the selected location. You can stick this app on your Desktop (or alias it there) for easy access, add it to your Finder sidebar or even drag it into the toolbar of a Finder window.
If you want to choose an app from a dialog instead, you can insert an “Ask for Finder Items” action at the beginning of the workflow. Set “Start at:” to “/Applications”, “Type:” to “Files” and uncheck “Allow Multiple Selections”. Running the workflow will pop up a file dialog asking you to select an application manually before requesting the destination and running the rest of the script. This might be faster than finding, dragging and dropping, in some cases.
Bonus tip: you can incorporate Automator workflows into shell scripts (and AppleScripts using do shell script) with the automator command line utility. You can call it directly on a workflow (automator nameof.workflow) or pass input to it using the -i parameter. The most practical application I can think of in this case would be to create an AppleScript application bundle containing both on run and on open handlers and both versions of the above workflow embedded in it. Then you could create a single application that would act on dropped files or offer a dialog if it was run directly. There’s probably an easier way to do that, though.
Grab copies of the workflows to get started (GrabIconWorkflows.zip), and I’d love to hear if you come up with other uses for them. That’s a wrap, hope it gave you some ideas for your own nerdery.
